Tulip flowers are often a sign that spring has arrived. Luckily, even if you forgot to plant the tulip bulbs the previous fall, you can enjoy origami tulips in your home throughout the year with these simple steps.
How to Make an Origami Tulip
This origami inflatable tulip design is a modification of the traditional origami balloon design. If you are not already familiar with this model, it would be helpful to review how to make origami balls before you start folding your tulip.
This flower is made using a square sheet of origami paper. Solid colors are the most common choice but tulips made using patterned paper can be quite pretty as well.
To begin, you'll need to create a balloon base form. This is a common origami form used to make many different projects. Start with the colored side of your paper face down. Fold the paper diagonally in both directions, then unfold so the creases form an "X" in the middle of the paper. Flip the paper over. Fold the paper in half horizontally and unfold. Fold the paper in half vertically and unfold. Use these creases to collapse the paper into the shape that is shown below.

Turn your paper into a small diamond shape by folding the front left and right flaps up to the meet the top point of the triangle. Flip the paper over and repeat.

Fold the left flap of your diamond over to the right side. Flip the paper over and repeat. Now, your diamond should have a solid face with no visible creases.
Fold the left side of the diamond over towards the right, folding slightly past the middle vertical crease. Fold the right side of the diamond over towards the left, folding slightly past the middle vertical crease. Tuck this second folded flap inside the pocket of the first folded flap. This will keep your tulip from coming apart when it is inflated.

Flip your paper over. Repeat the previous step, double checking to make sure your folds are even and that one flap is tucked inside the other.
The bottom of your paper should have a small opening. Gently blow inside this opening to inflate the model, keeping your fingers on the sides where the folds are tucked inside each other to ensure that everything remains in place.
Once the model is fully inflated, pull back each of the four triangles at the top and carefully curl them to form the petals of your finished origami tulip.

How to Make a Tulip Stem
Some people simply rest their tulip flower on a bookshelf or in a pretty bowl surrounded by decorative rocks, but you can also choose to make a stem so that your tulip stands up on its own.
To make the stem you will need one sheet of green square origami paper the same size as the sheet you used to make your tulip.
Create a kite base form. This is done by folding the paper in half diagonally, starting with the white or reverse side face up. Unfold, then fold each of the two opposing corners in towards the middle crease to create a shape that looks like a kite.

Fold the left and right sides of the kite shape in towards the center crease.
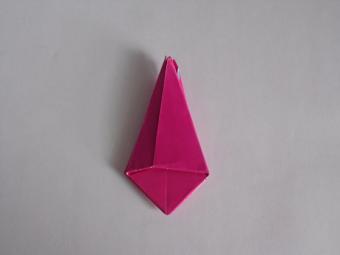
Fold the left and right sides of the kite shape in towards the center crease once more. You now have a diamond shape with a very thin, pointy end at the top.

Flip your paper over. Make a horizontal fold at the intersection of the diamond shape.

Fold the paper in half vertically, folding it back onto itself. The tall, thin portion of the paper is the stem for your origami tulip. Gently pull out the smaller portion of the paper and curl it back to form the leaf.
To complete your project, add your tulip on top of the stem. You can either insert the stem directly into the opening that you used to inflate the flower or use a low temperature glue gun to join the two pieces together. If you opt to forgo the glue, be careful that you don't accidentally make the hole too big or tear the paper of your flower.

Tulip Variation
You can also make an origami tulip using a square base and the method demonstrated in this tutorial video from noted origami artist Joost Langeveld. This project also includes a different type of stem, leaves, and even origami sand to place the finished tulip in.
Caring for Your Origami Tulips
Use a feather duster to keep your origami tulips clean and place them out of the sunlight to prevent fading. Unlike real tulips, origami flowers will last forever.