Simple Heart Origami Bookmarks

A simple heart origami bookmark is a great project for beginning paper folders. Choose a paper with a double-sided pattern if you like, since the finished bookmark will show both side of the paper. You can make two bookmarks from one sheet of origami paper, which makes this an economical option for conserving your paper stash. Keep one for yourself, then give the other to a friend as a small gift or even as part of an origami Valentine card. You can even add a secret note to the inside of the bookmark!
Step 1 - Cutting the Paper
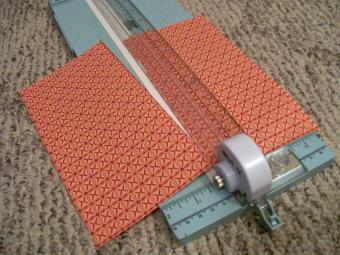
To begin making your simple heart origami bookmark, fold your paper in half. Cut down the middle crease with scissors or a paper trimmer, just as you might when making a card. Try to keep the cut nice and clean, since you'll be working with this straight edge. Set the paper cutter aside.
Step 2 - Make the First Creases

Fold one piece of the paper in half to make a crease, then fold back. Fold each side into the middle to make a crease, then fold back. You can use a bone folder or other tool to help make the crisp creases, or you can simply use your fingernails or a table edge.
Step 3 - Fold the Corners

Fold one corner down to make a crease, then fold back. Fold the top of your paper back.
Step 4 - Form a Point at the Top

Fold each corner in to meet the center. The top of your paper will now come to a point.
This is a great place to add a secret message to your bookmark if you'd like to. Simply write your note on the inside of the paper - the side currently facing up. You can offer a blessing, a secret wish for reading happiness, or even a little love note. The recipient of your bookmark will have no idea they are carrying this special message with them as they read.
Step 5 - Continue Folding to Create the Heart

Fold the top of your triangle back along the crease. The top of the bookmark now looks like a barn roof.
Step 6 - Begin to Form the Heart Shape

Open each side, then flatten. You are starting to form the top of the heart.
Sign up for our newsletter featuring all the latest stories and products we love.
Step 7 - You're Almost Done Folding!

Fold each corner down. You can begin to see the heart forming.
Step 8 - Reveal Your Origami Heart Bookmark

Flip over to reveal your finished simple heart origami bookmark. There are lots of ways to embellish the finished bookmark if you desire:
- Add a calligraphy message with a great quote about friendship or reading.
- Use puff paint to add some dimensional accents to the finished heart.
- Make a tassel for it with embroidery floss or pretty string.
- Add a small photograph to the center for a personal touch.
Do you want to make an origami heart decoration for your home? Check out the LoveToKnow Origami tutorial How to Make an Origami Heart.