Simple Origami Box Instructions

Origami box instructions make it easy to create a special gift box for almost any occasion. Boxes folded from 6x6 origami paper hold candy and other sweet treats. Boxes folded from 12x12 scrapbooking paper are large enough to hold a bracelet, necklace, or a pair of earrings.
Step 1

With the patterned side of the paper face down, fold the paper in half horizontally. Open it back up, then fold in half vertically. Open again to reveal a folded cross in the middle.
Step 2

Using the mountain fold lines as a guide, fold each corner in toward the middle of the paper.
Step 3

Fold the left side in to the middle, then the right side. Unfold the paper, turn it 90 degrees and fold the remaining two sides into the middle.
Step 4

Open two corners diagonal to each other, leaving the other two corners folded in. Use your forefingers to coax the corner folds in, pulling the third edge upwards.
Step 5

Tuck the top flap in to form the side of the box. Repeat to form the final side of the box. Secure the flaps with a glue stick or a bit of double-sided tape for added reinforcement.
Sign up for our newsletter featuring all the latest stories and products we love.
Step 6
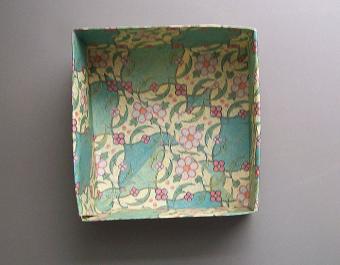
To make a box with a lid, simply repeat the above steps with a square that is slightly smaller. For example, paper that is 11 ½ x 11 ½ works well to create the second part of a box made with 12x12 scrapbook paper.
If you need to make a card to go with your gift, check out our Origami Envelope slideshow.