Completed Origami Throwing Star

Origami throwing stars, or ninja stars, are popular subjects. They are easy origami projects that can really fly if the folds are accurate and creased well.
The throwing star is an ancient ninja weapon that is sometimes called a death star or a "shuriken." It is a powerful concealed weapon, and even when created with paper, it can be thrown a long distance.
Use Two Paper Rectangles

This basic throwing star pattern is made from two rectangles that are twice as long as they are wide. If you are using traditional square origami paper, you can tear or cut a sheet in half and use it that way.
If you are using duo paper, paper that is a different color or shade on each side, try using two different colored halves. This will add interest to your star and make it look more distinctive when thrown.
Fold Sheets in Half

Select two paper rectangles that are twice as long as they are wide.
Fold both sheets in half lengthwise, and then fold one corner of one sheet up at a 45 degree angle.
Fold Opposite Corners

Fold the opposite side of the sheet down at the same angle.
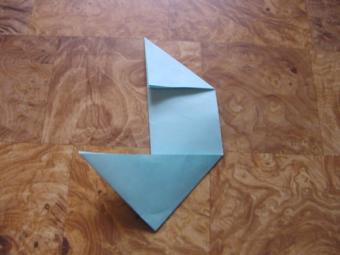
Create a Mirror Image

Repeat with the second sheet, but where the first fold was up, this time fold down, and fold up on the opposite side.
You will now have two corners folded per sheet. They will be going in opposite directions and be mirror images of one another.
Begin Double Fold
Take the first sheet and fold one corner up again, following the seam line to create a triangle.
Reverse Side of Fold

This is the way the fold looks on the reverse.
Finish Double Folds

Reverse the fold on the opposite side, this time folding down.
Repeat the process on the second sheet, again creating a mirror image.
You will now have four star points, two of which are mirror images of the other two. Take a moment to make sure that your folds are straight and flat.
Tip: The more precise your folds are, the farther and straighter your star will fly.
Position Cross Pieces

Place one piece of paper on top of the other with the center diagonal seam side of the lower piece facing down, and facing up on the top piece. Position them so that one is perpendicular to the other.
Fold the First Star Point

Wrap the lower left star point up over the top piece to create a triangle. Tuck the corner of the triangle under the flap in the top fold.
Sign up for our newsletter featuring all the latest stories and products we love.
Fold the Second Star Point

Repeat on the opposite side.
Finish Last Two Star Points

Turn the project over and repeat on the last two star points.
Your Star Is Ready To Throw
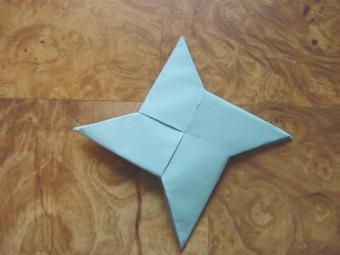
You now have a completed throwing star. Round out your arsenal by making some other origami weapons, like a set of origami swords or an origami pistol.
Special Note: Even though origami throwing stars are made of paper, they still have sharp points that can be dangerous. Use good judgment, and avoid playing with them indoors.